This is an old revision of the document!
Table of Contents
Tutorials
Launching Astroid
The Astroid Launcher will house the various applications that will be used as part of the Astroid Treatment Planning system. Any updates to these applications will automatically be deployed to the Launcher. The user will be notified that there is an update or a new version that will need installation once they have chosen an application. This will ensure that cloud version of Launcher and the local version of Launcher remain synchronized. Use the following steps to open the Launcher and launch the Astroid Planning App:
- Click the blue Login button
- Select your realm from the list of available realms
- From the left side tool bar select the application you would like to launch
- Click the blue Launch button
- If there is an updated version of this application, the Launch button will not appear and instead an Install button will be available. Click this to allow the latest version to install. After the latest version is installed, the blue button will revert back to Launch, which you can now click
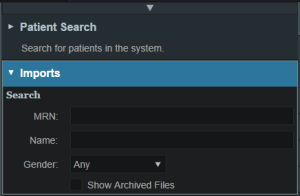
- This will open the Astroid Planning application and bring you directly to the main patient search screen
- You may now proceed with opening a current patient or importing a new patient
Uploading DICOM Patient Files
The Astroid Planning App stores a list of DICOM files (only CT Image Set and Structure Set files are supported at this time) that are available and ready for Import. There are several approaches that can be used to upload DICOM files into this list.
DICOM Receiver Service
For clinical users, a DICOM receiver is generally installed, allowing for direct exporting from contouring software or other planning systems for use within Astroid. In such cases, this DICOM receiver service will be pre-configured to upload the incoming files directly to Thinknode and will also create the records necessary for the DICOM files to be populated into the Astroid Planning App list of available Imports.
Uploading using the Planning App
DICOM files can also be uploaded directly from the Astroid Planning App. The steps below describe the process in detail.
-
- All DICOM files found in the selected directory will populate in the list field
- If the file list appears correct, click the blue Upload button in the bottom right corner to start the Upload
- Once the file(s) finished uploading they will appear in the list of available files, click back on the Search Files sub-block to return to the list of available files
Bulk Importing using Python
Note: This section requires the user to be familiar with python and the existing .decimal python libraries.
Importing a new patient into the Planning App requires taking a local DICOM directory and posting each of the files through the Dicom App utilizing Thinknode. Each DICOM patient is posted to the Thinknode ISS and an entry is then added to the thinknode RKS that allows the Planning App to see that a new patient has been added. The steps below explain how to upload patient DICOM files using the open source python Astroid Script Library.
- From the .decimal GitHub repository open and edit the post_dicom_patient_rks.py python file.
- Ensure the thinknode.cfg file is set appropriately for your user, account, and realm.
- Edit the following line to point to the directory in which the DICOM patient files are located (note: all DICOM files in this directory will be uploaded):
# Post patient data into ISS
obj_list_id = dicom.make_dicom_object_from_dir(iam, 'F:/Datasets/demo-patient/prostate')
- Run the script and allow the patient to upload to thinknode ISS. After the DICOM patient files are uploaded to ISS, an RKS entry will be created for the Planning App to recognize it as a DICOM file that is available for import.
Importing Patient Data
Now that a patient has been uploaded from DICOM, the Planning App should recognize that new patient files are available to import into a Planning patient.
- Open the Astroid Launcher and launch the Planning App from your realm
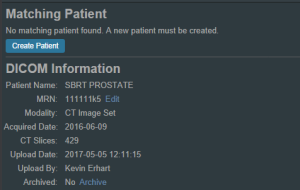
- Select the CT image set from the list of available files for import
- Ensure that the MRN is correct
- Ensure that the date and time displayed in Astroid matched the current date and time in the current Windows OS.
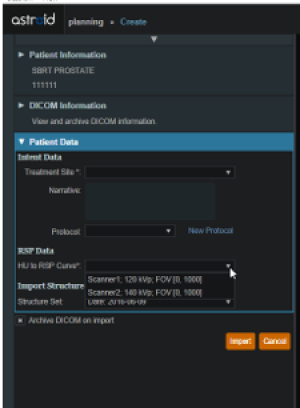
- Fill in the requested Patient Intent, taking care to select the appropriate Treatment Site as this selection contains the template information that will be used during structure set import
- The corresponding structure set (SS) file to import with these images will automatically be selected. The structures will show up below the Patient Data box in the Import structures box (note that the available choices will be automatically filtered based on the structure set DICOM UID information)
- The structures associated with the data set will be seen in a list of the available structures
- Here you may choose whether or not to import each structure by checking or unchecking the box beside each structure name
- Matched, Assigned, and Custom structures are designated with corresponding tags at the end of the structure name in the structure list
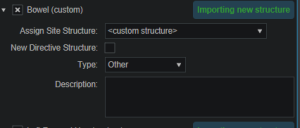
- You may only edit structures that are shown as Custom, which indicates the name did not exactly match a course structure from the Treatment Site template selected above
- For all custom structures, the type is by default set to the value from the DICOM file. If there is no type specified in the DICOM file the type will be set to “Other”, unless it contains the letters “TV” (as in PTV or CTV), in which case it is assigned the type of “Target”; the type may be changed here if needed
- Alternatively you may Assign a Custom structure to a course level template structure using the provided drop down menu (this is useful when structure names contain typos or contour names otherwise do not match your standard site protocols)
- Once all structures have been selected, assigned, and edited as needed, click the Import button to create the patient and import the CT Images and Structures into it
- The patient is now created and all available data has been imported
- Click on the Back to Import button to return back to the Imports task
Structures in the Data Model
There are multiple levels that various structures can live at. Each level and structure type will effect how the structure will relate to the plan. Refer to the Structure Data Model Guide for more details.


